Hello and welcome to the Windows installation tutorial for Kyocera print drivers. In this installation article we’ll be describing how to install the Windows print driver for Kyocera.
My operating system that I’m using in this tutorial is Windows 10, but this tutorial should be able to assist people running other Windows operating systems.
Instal Kyocera Print Driver for Windows

The first thing you need to do is open up your favorite browser, and search for kyocera documentsolutions.com America. You want to navigate to the download center, once you’re at the main site make sure it’s Kyocera Document solutions America.
Select your product category, if you have a newer machine it will be considered a color copy or a black and white copier or printer. If you have an older machine it will be found in the legacy section. In this tutorial we’ll be installing the print driver for the new Kyocera TASKalfa 406 CI.
Then select print drivers. Always download the newest release of the KX print driver. Make sure it is the 32 and 64-bit compliant to save time. I’ve already downloaded this driver.
I’ve downloaded to my desktop next we’ll extract this, right click on it and left click extract all. This is going to extract my desktop to a folder called this.
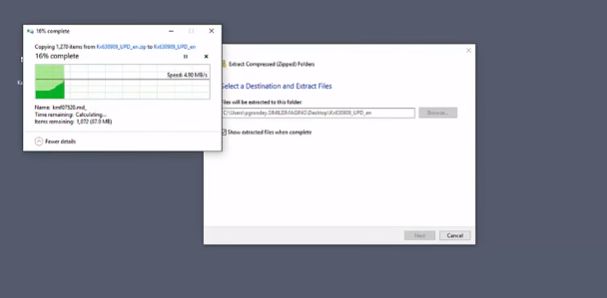 Now the folder now that the folders extracted it’s on your desktop. Double click the folder, double click it again. We want to run the setup.exe, double click. View an app, if your unallowable and due to restrictions of your login credentials you’ll want to speak with your system administrator about this.
Next we will hit accept ok and then click on express install. I have many different key s errors on my network as you can see the one I’m interested in is the task cup of 406 CI with the IP address 192.168.1.70 this number can be found on the Status page when you print it from the MFP itself.
Read Also: How To Connect Printer In Windows 10
I’m going to check use host name miss boarding and I’m gonna uncheck the status monitor and then I’m gonna click install, once finished I’m going to click print test page and I’m going to uncheck set duplex as default because I do not want all prints to come out as duplex. Next hit finish, in close. The print driver is now installed.
To Set Default Printer
Next we’re going to define some defaults we want to access the Control Panel, and then go to Devices and Printers.
This can take a long time to load on certain Windows 10 operating systems. Now that the window is populated you can see that your operating system has already set the new printer as your default printer.
If you don’t want it to be you can right click another one and set as default. We now want to right-click on the device and go to printer properties, then go to device settings. and click auto configure.
Auto configure now this automatically configures your new print driver with any accessories that your machine may have, our machine did not have any accessories there’s nothing else populates.
Next we get to advanced we set the printing defaults, these are the defaults that your print driver will use when you print. We typically set it to black and white media type plane, and hit OK.
We want to make sure that that that is carried over into preferences as well. Hit OK next click the ports and configure port, make sure that this box is not checked and hit OK and close.
Your print driver is now installed successfully and defaulted to black and successfully and defaulted to black and white thank you for reading.