Hello everyone how are you doing. This is cekprinter here with another quick tutorial. In today’s it’s warm and show you guys how to disable recent files from being tracked on your file explorer window in Windows.
How to Disable Recent Files in Windows 10
So this could definitely be an annoying issue you guys might be running across here, where if you open a file explorer so I’ll actually open it up here just for the take of this tutorial. And you’ll see a sanction says recent files, and this could easily be cluttered with a whole bunch of files that you might be opening if you’re downloading and running a lot of applications.

So we’re disable the tracking of this I’m going to show you guys how to do it, and we’re gonna jump into it quite simple here. Very simple here we’re going to go ahead and open up the Start menu type in run.
Run the best manager should go make a run right above app, just go ahead and select that and I’m gonna have a command %AppData%\Microsoft\Windows\Recent and than adjust want to paste it in here so control V or right-click and paste whatever your preference to copy and pasting is.
And you want to go ahead and select OK, once you’re in here you want to tap control a just to select all the files in here, right click and then left wand delete once you delete it out of there if we go back to this PC on the left side.
So if we close out of here. It should clear out the list of any recent files that came up in the list have you had anything. You know if you’re looking to permanently disable. This feature you can go ahead and access the registry functionality to disable it.
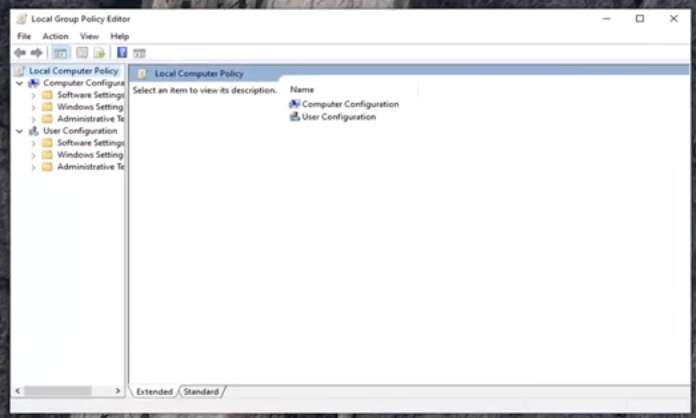
So we’re gonna start by opening up the Start menu, so if you know Windows 10 or higher edition I’m gonna show you guys how to permanently disable recent files from showing up at all. So that’ll be by opening up the Start menu to want to type in local group policy here to edit group policy go ahead and left click on that.
Read Also: How To Disable Remote Assistance in Win 10
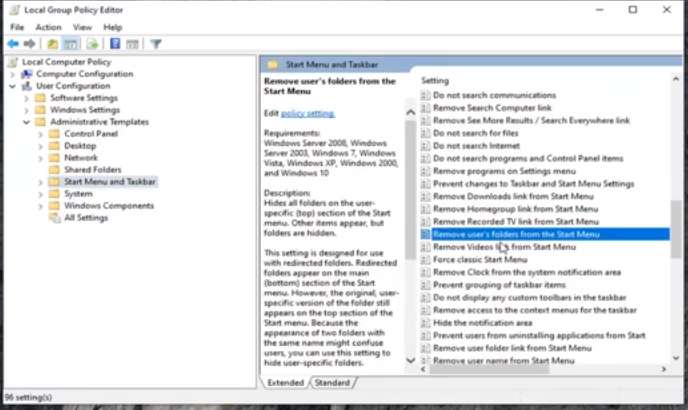
On the left side you want to go ahead and expand the user configuration section, so ignore the computer configuration section we gasp you minimize that, and underneath user configuration you want to expand the administrative templates folder either double click or left little arrow next to it to expand the drop-down.
Should be something here is the Start menu and taskbar, you want to go ahead and left click on that, and now on the right side there should be an option that says don’t keep the history of recently opened documents.

So just gonna have to, look through here for a moment here. actually click on one here and start typing do not keep and there you go do not keep history of recently opened documents, double click on that, please note they may not all be in alphabetical order here you might have to sort it or do what I did just click on one and start typing in.
So again do not keep history of recent open documents is the name of it, and you want to set this to enabled and then click on apply and ok once you know what that close out of here again that would apply for Windows 10 professional and higher editions meaning that will now work for Windows 10 Home Edition.
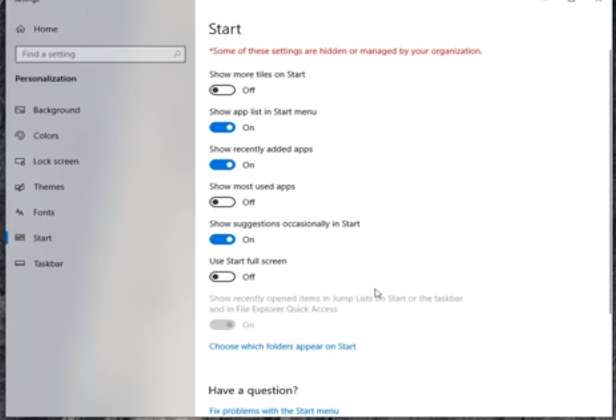
And nothing you try would be to open up the Start menu. Type in Personalization, well the best manager should come back with teams and related settings go ahead and left click on that. Keep in mind with this modern UI they constantly are changing different settings around between different versions of Windows 10.

So this might not stand the test of time this particular method, but I thought I would include it nonetheless and you want to go select the start option on the left side, and now there should be something that says show recently opened items show recently.
Read Also: How to Fix Alt + F4 Not Working
Open items in jump list on cert or the taskbar in File Explorer click access keep in mind it’s grayed out in my case because we just disabled it in the group policy editor. But if we didn’t do that there’d be an option to turn this to the off position so you just want to turn that off, with disable recently open items and that’s pretty much about it.
So I do up this brief tutorial was able to help you guys out and as always thank you for watching and I do look forward to catching you and I do look forward to catching you all in the next tutorial.